
The Top Studio Acoustic Solutions on the Market Compared over Four Different Rooms
Ever wondered how different solutions on the market compare to each other?
I wanted to invest in exposing this once and for all. Not everyone can analyse based on physical properties - so here is the moment of truth.
I contacted our 2 leading competitors in Europe; the biggest companies with the best reputations.
I sent some room pics, dimensions and a budget of 2,000 EUR net.
I got recommendations from them.
So, We bought the recommended solutions, installed them and then tested them to compare to ours.
And then I tested them in more rooms! So not just 1 room but 4!
We will be able to see the trend easily this way.
We also did some other fun tests along the way too...
All in, this cost me 15,000 EUR to do to share with you. So I would really appreciate if you can take the time to enjoy it. It should be very informative. This is information that you would otherwise not have access to.
I will make it easy to read and very visual!
If you could help me in return by sharing it - you will also be helping those who read it - and I really appreciate any help I get. It's an up-river swim, trying to clarify the hidden reality of studio acoustics.
This article is highly visual, so you can simply scroll through! Reading will empower you also, though...
Okay, let's get stuck in!

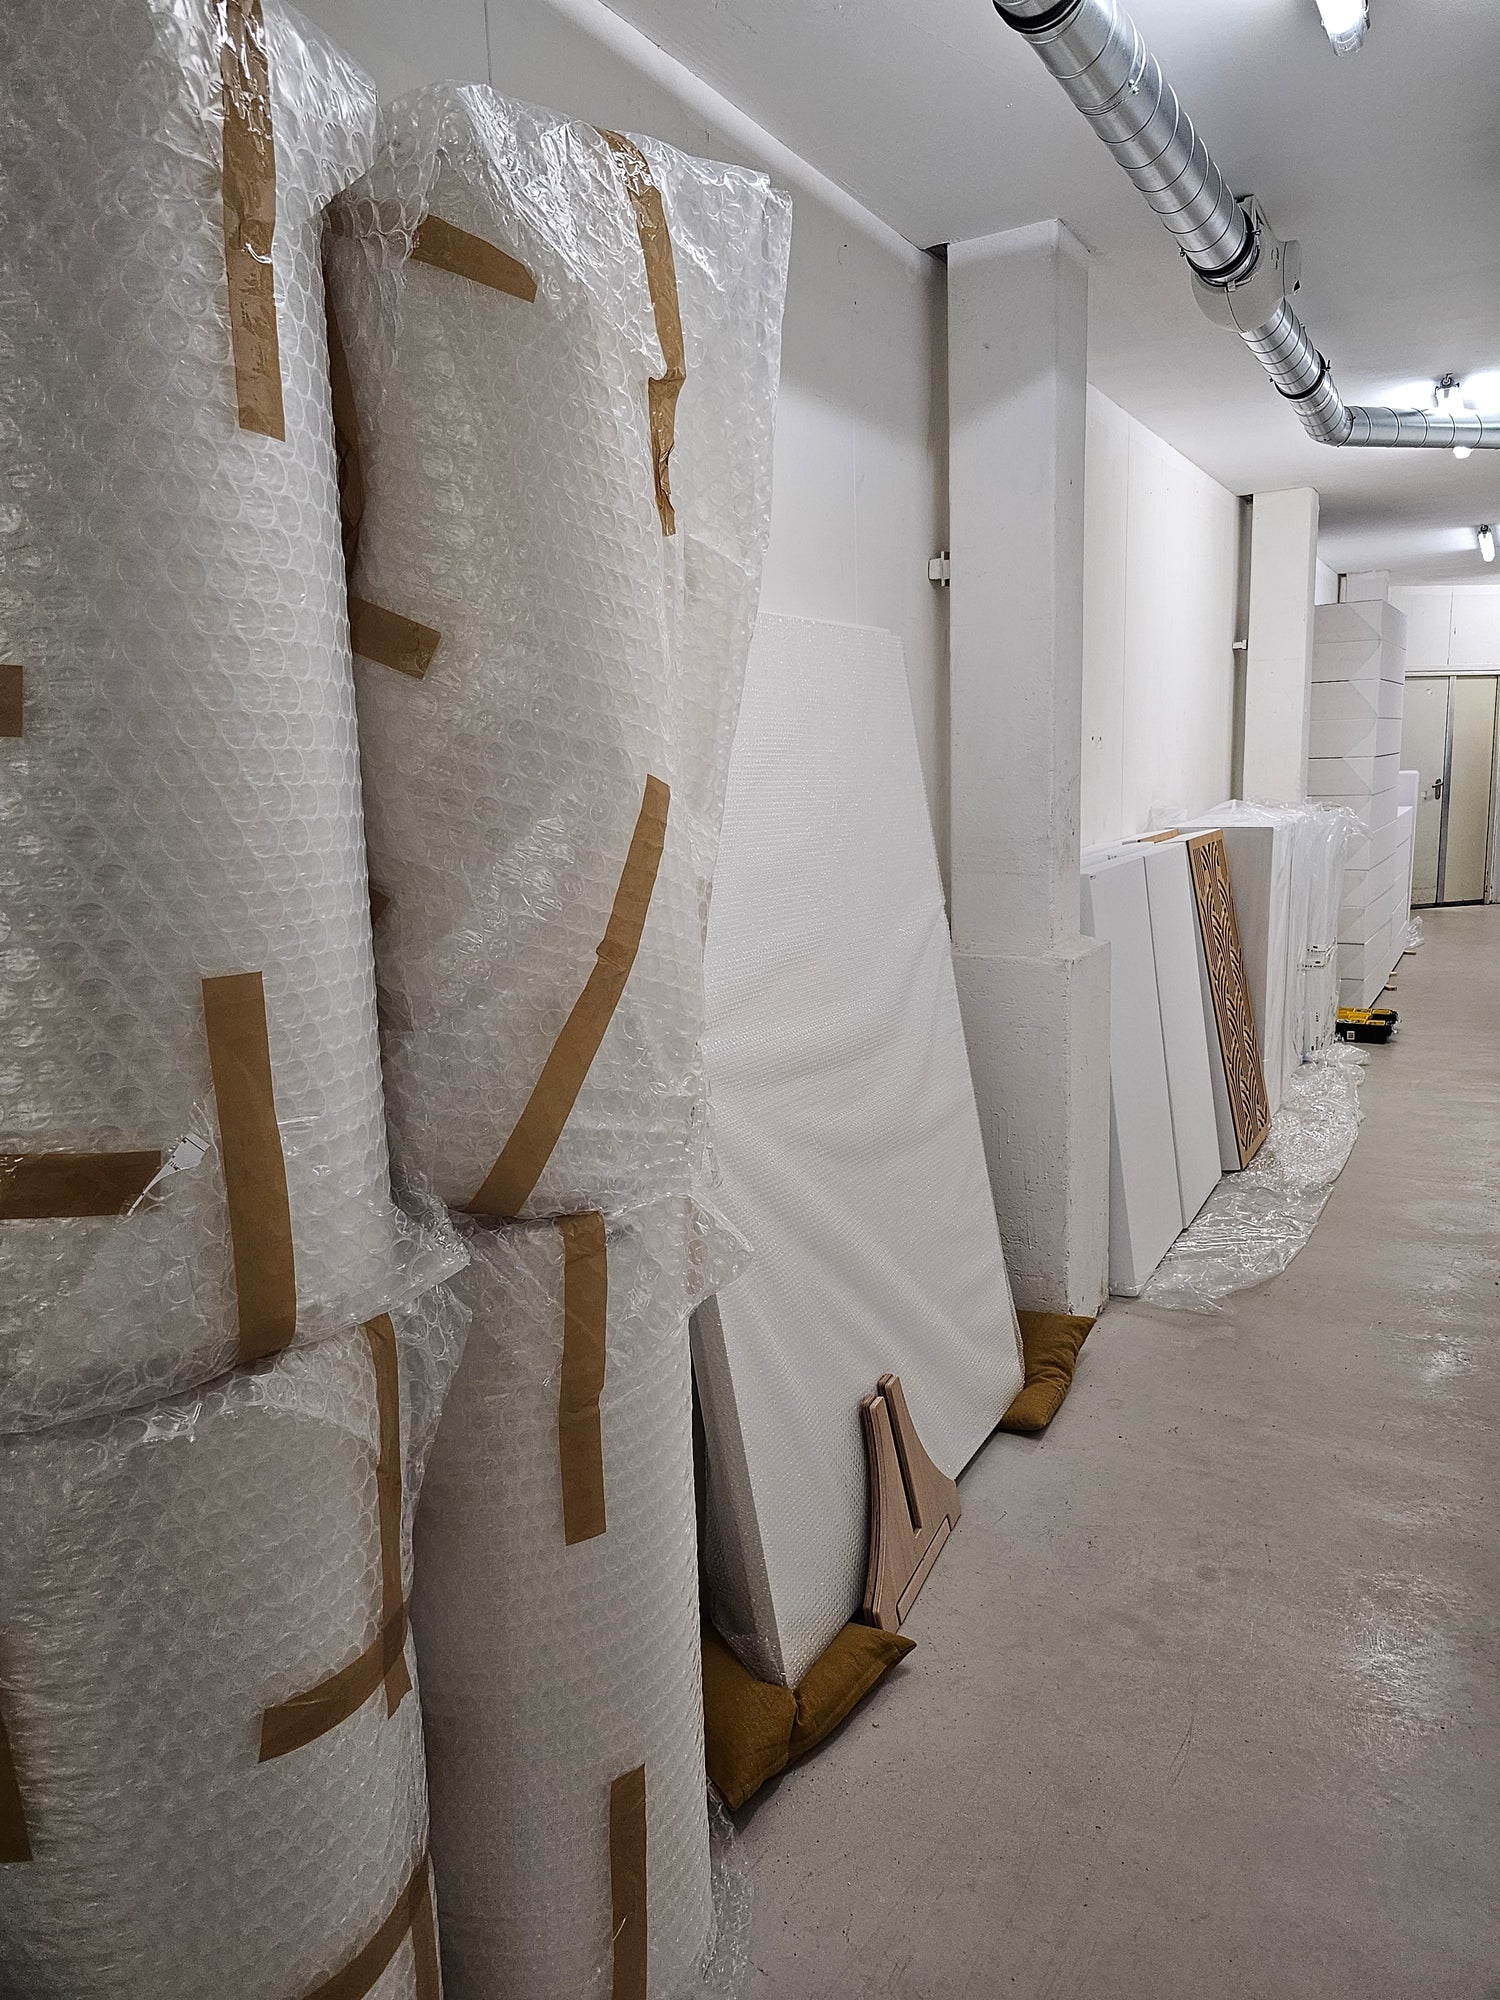
We rented a studio from one of my studio houses in Berlin, emptied it and got to work! Here is a stack of bass traps from KISS YOUR EARS from our 2024 range.
Note: The 2025 versions are actually greatly improved. You have to contact us to get them.

Even logistically, this project was rather large!
We contacted our 2 leading competitors with a 2000 eur net budget (2400 gross) - we purchased the recommended treatment... Here it is backstage chilling outside the arena!

We decided to test the recommended solutions over 4 rooms to demonstrate the trend. This is a very practical experiment, based on a situation you may actually find yourself in!
Studio 1 Set Up
![]()
We measured each room empty first.

Then we brought in each recommended treatment from our leading competitors sequentially. First leading competitor 1...

Read about why I do not recommend cylindrical traps here.
The build quality on these is "sturdy, but from the cheapest materials".

Overall this solution offers a strikingly low amount of mass considering the physical properties of the room and also the sonic properties of modern music.

On to leading competitor 2. Now this seems more like studio treatment. However, there's also a problem with these tri-traps acoustically as they are velocity absorbers that sit in a point of high pressure, which is 90 degrees out of phase with velocity. But that is not specific to this company, that's just the reality of tri-traps being a very dated design.
Clearly finer aesthetics, albeit still a bit cheap feeling.

Thin panels on side reflections is dated in my opinion. It's a missed opportunity to have more impact.


Here we can see the depth of the side reflection panel recommended from Leading Competitor 2 compared to KISS YOUR EARS. We like them chunky.

I do like those soffit traps from them in the corner there, though. We have some designs like that too!

The ceiling cloud, or sail - whatever you want to call it - is simply another early reflection function absorber, just like the side walls and back wall. See it for what it really is.

I actually respect Leading Competitor 2. They at least make studio treatment. Even though we beat them on quality and price years ago, they have an important place. The industry has moved forward since studios that look like this but I do respect their contribution.

The back of the room with Leading Competitor 2's solution.

I've designed many low cost highly isolating studio door systems. I can design one for you too!

Okay - just for fun - we put the solution from Leading Competitor 1 back in the room with the solution from Leading Competitor 2.

This is often what we see, even in some pro studios, just a mix of less effective units plopped around the room.
We are now looking at 4,000 EUR worth of treatment. I wonder how much will be needed of our approach to equate the result from this? Let's see...

Okay, now on to KISS YOUR EARS. Finally...
Tip: If you don't have DIY skills, and have a low budget, take care of the front corners closest to where you are working (assuming your room is set up in the optimal way aka. lengthways as in these pics). Then build some walls to the left and right of you, where the first reflections from your monitors will be.
My preference is actually to build the corners up with horizontally orientated units stacked on top of each other. And then the same for the side walls. It's easy as heck, very effective and makes the room feel way bigger. Here is an example.

Okay, vertical corners first...

Then we made a stack at the back of the room in the early reflection position.
Actually, ideally this is how we would do all of the reflection points in the room.

45 degree covering of the horizontal wall to ceiling corners now.

If you take care of the vertical corners in your room with optimised bass traps, and then also take care of the ceiling horizontal corners on the side, you will have already resolved a majority of the bass issues in your room.

Nice and chunky. Very effective traps in very effective positions.

Now onto the side walls. Notice we suggest fat boys here too.

The ceiling reflection position. More fat boys. My thinking is that we cannot treat the floor so on this dimension we have to treat the ceiling properly.

This is the back of the room with the KISS YOUR EARS SOLUTION.

This is the front of the room with the KISS YOUR EARS solution. Space ship vibes.
Note: the only reason there is a gap between the ceiling units is that there was already lathes installed on the ceiling so we just went with these positions for simplicity.


Here's a diagram of this kind of system. This is how we would usually recommend you to add units to your setup in increments of ca. 4 traps per time.
In other words, here is a free 6 step plan to sorting out your room (You probably don't need to go further than step 6 of this unless you are seriously pro).
With this setup we have here, we are actually somewhere between steps 4 and 5.
I can even simplify it: Take thicker units for EVERY position (if your music is not 1990s levels of bass!), split them into 50/50 - 50% over corners (bass trap function), 50% over reflection points (side walls, front and back wall, ceiling).
If you take 1-1.5 traps per m2 of floor space of your room, this will basically change your life!

Okay, so we tried 4,000 EUR worth of both Leading Competitors solutions combined. So let's put 2,600 - 2,700 eur of our treatment in and see what's up. I'm actually much happier to see the reflection positions on the sides set up like this.

The back view...

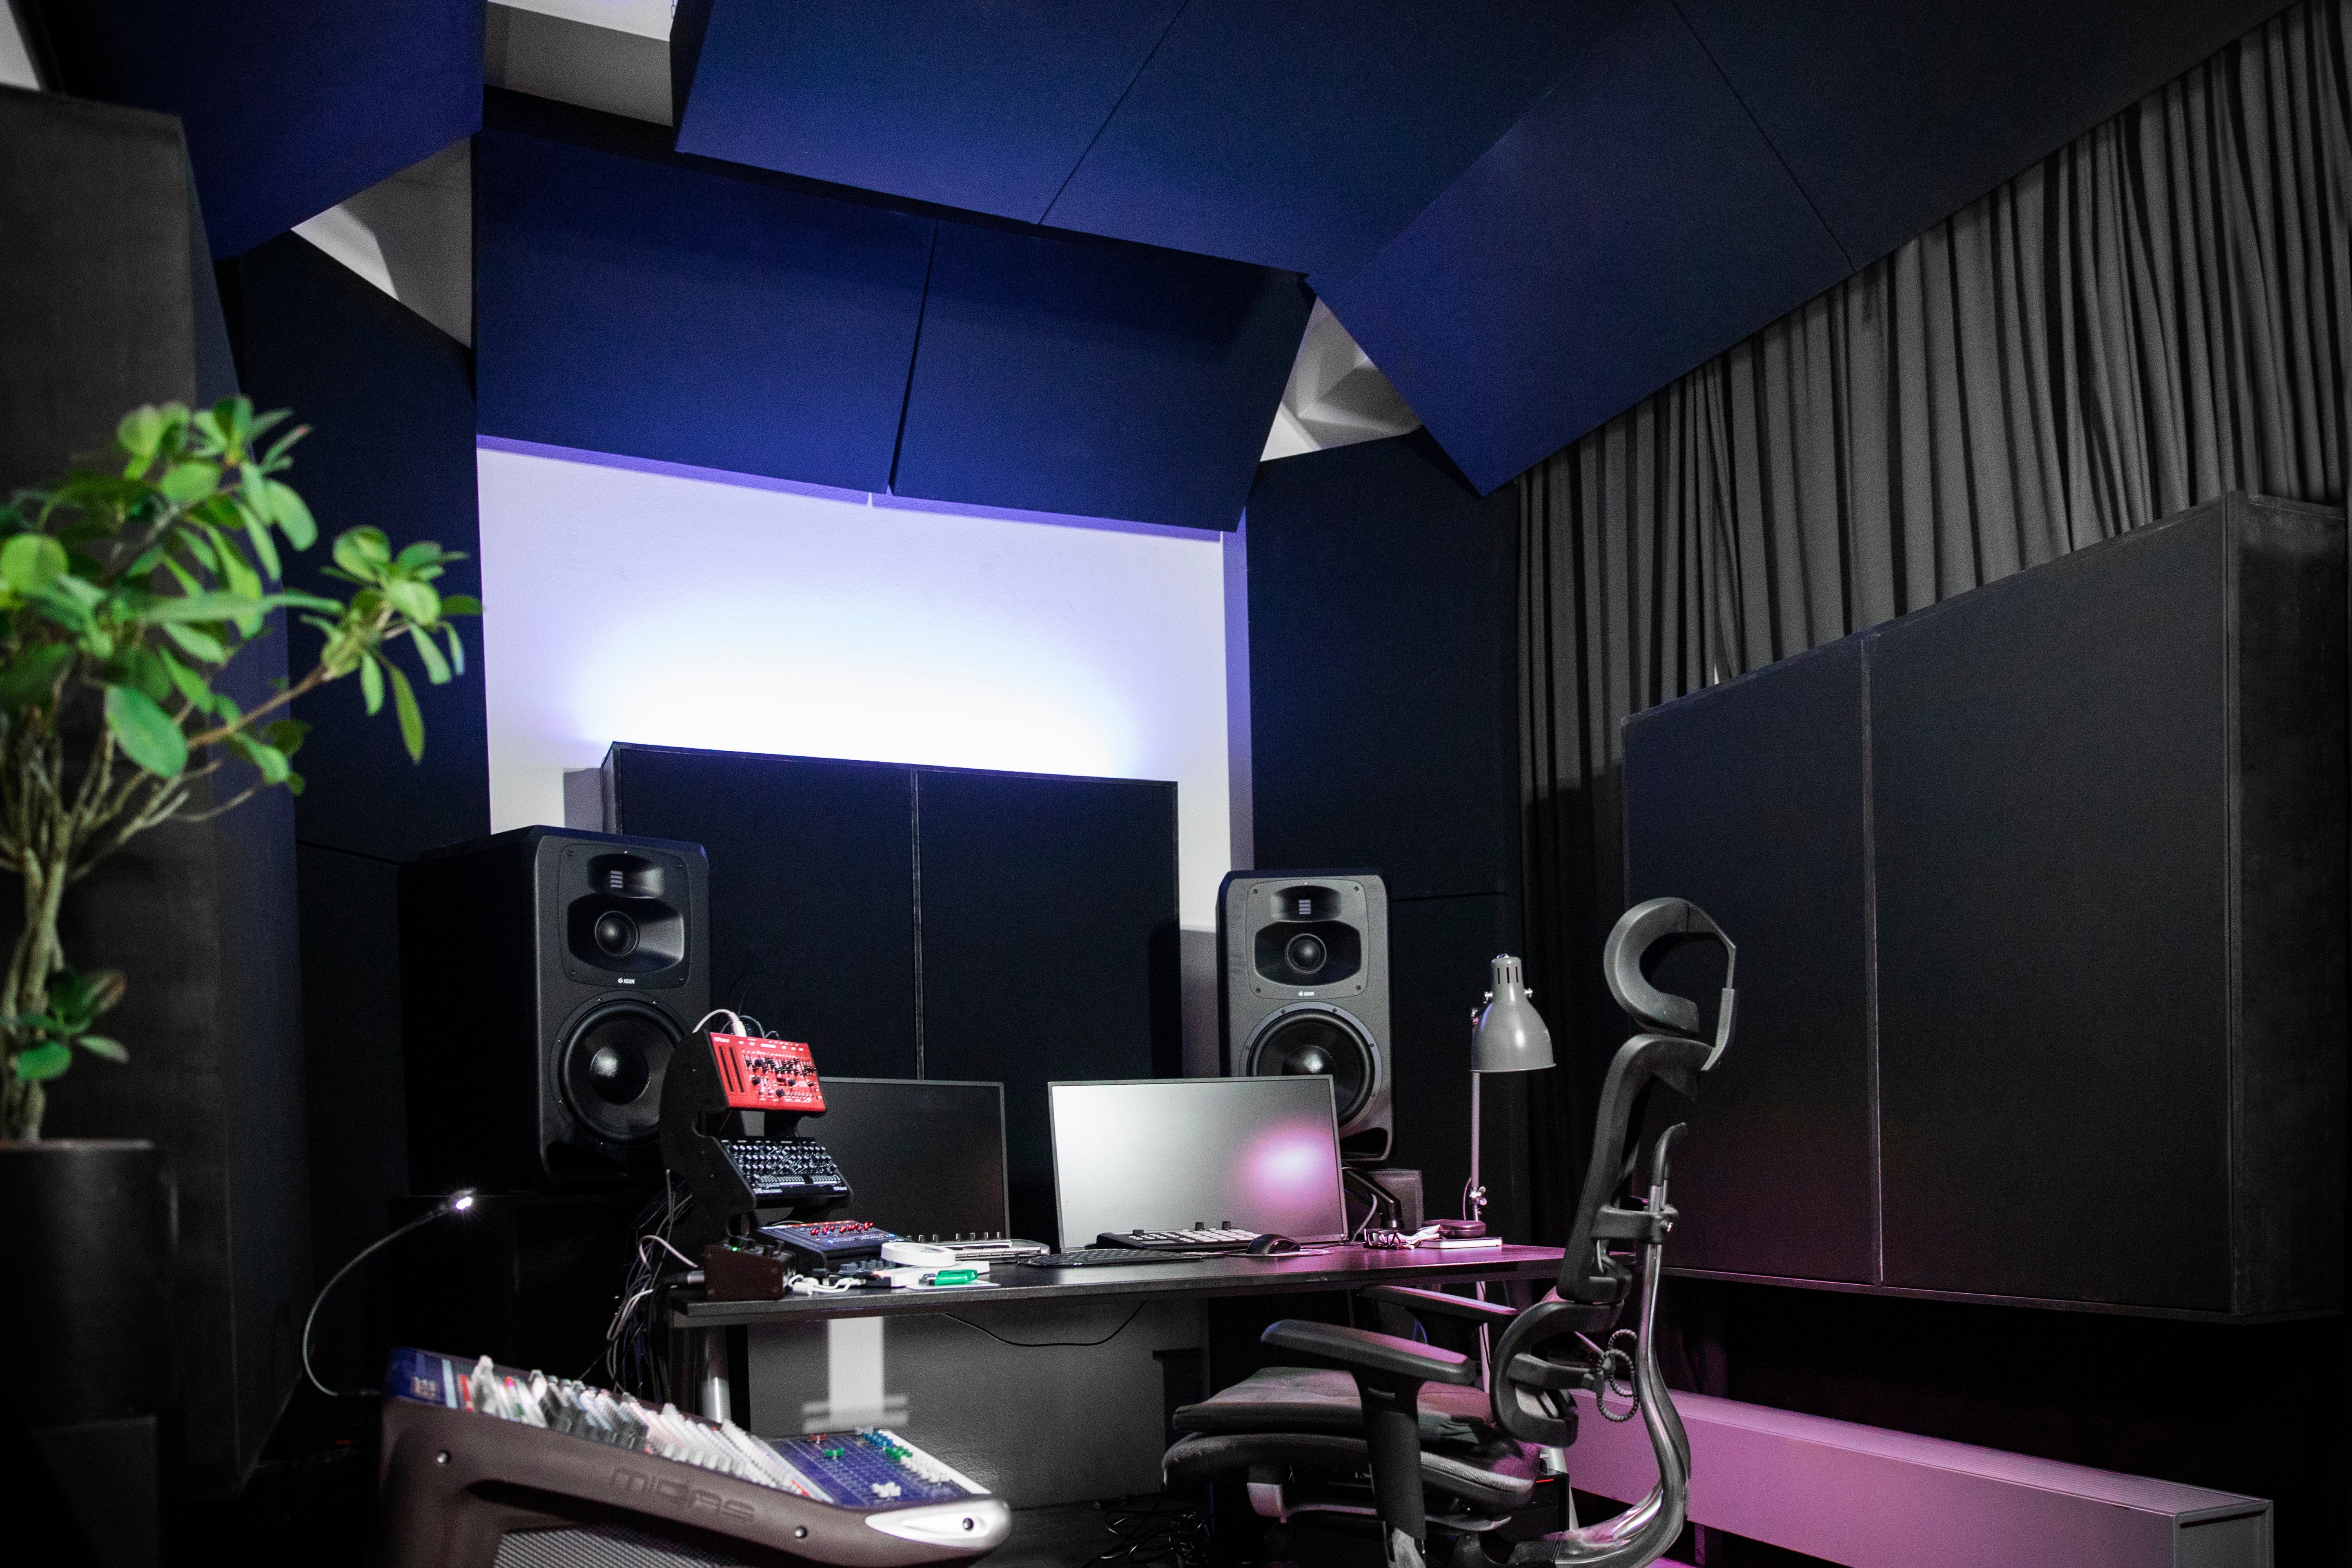
And while we are at it, I wanted to show another option - This is the same room but fully set up with gear, etc. and massive monitors. This was in 2021, so a 2021 solution from KISS YOUR EARS.

The back view...
Studio 1 Data
Studio 1 Dimensions
- Length: 4.75 m
- Width: 3.45 m
- Height: 2.61 m
- Total Area: 16.39 m²

Here are the settings of the waterfall graphs. They are also showing 1/48 smoothing.
Take a minute to understand the standardised data we are showing you. We have chosen these settings for maximum clarity.
A waterfall graph (or cumulative spectral decay - CSD) is used in acoustics to visualize how sound energy decays over time across different frequencies. It shows:
Frequency (Hz) on the X-axis - we are showing 40 Hz to 5 kHz
Time (ms) on the Z-axis (decay over time) - we are showing 300ms
Amplitude (dB) on the Y-axis (loudness of frequencies) - we are showing a 45 dB SPL window
This is particularly useful in room acoustics, speaker measurements, and resonance analysis because it helps identify ringing, modes, and resonances.
1/48 smoothing means that the frequency response is divided into 48 bands per octave, with each band being smoothed. This provides:
Very fine resolution → You can see sharp resonances and narrow-band artifacts clearly.
Less noise than raw data → While it preserves details, it still removes some random measurement noise.
Best for detailed resonance analysis → Useful in loudspeaker and room mode analysis, helping to pinpoint exact problem frequencies.
![]()
Studio one empty. Most empty rooms look like this. A nightmare to attempt to mix in!
If you need another guide on reading these waterfall graphs, I've already written it for you.

Leading Competitor 1's solution. You can see the white area at the bottom starting to form. That is one of the main things we are looking for. Unfortunately, this is still quite a rubbish room to make music in. We would want to see a lot more impact on the resonances. Everything from 60 Hz to 400 Hz is still quite mangled. Above that, the decay time is around 250 ms - we would rather see 100 ms less, eg. 150 ms. All in all, not a great solution for a music studio. Fine for a cinema room or concert hall that will have more absorbers brought in (people are absorbers).

Leading Competitor 2 Solution. Clearly much better than Leading Competitor 1. Notice how there is a lot more of that nice white stuff appearing at the bottom, aka. the resonances and reverberation is being attenuated. Still, this solution is not quite substantial enough to prevent 70 Hz, 100 Hz and 150 Hz from resonating past the 300 ms window.

Both Leading Competitors Solutions piled in - 4k worth of Acoustic treatment from others. Okay, now we are talking. Again, focus on the line at the bottom, not the top. The top is the SPL. Look at the SPL graph for that! Here we are looking to see if the resonances are substantially resolved - and they almost all are - down to 40Hz.
However, that was expensive and not aesthetically continuous. Plus, our "meat and potatoes" aka. main experiment was the 2,000 eur net budget solutions... This is literally double that.

KISS YOUR EARS v1. 2,000 EUR solution. Absolutely dominated the other two solutions in this experiment. The results do indeed speak for themselves.

KISS YOUR EARS v2. 2,600+ EUR solution. Tight. Almost everything is around 120 ms.
I would call this the sweet spot.

KISS YOUR EARS - Bonus Round - The 2021 Setup... This was not normalised with the other measurements, as you can see. It appears quieter because the readings are all standardised. However, this is interesting to see.
Notice how the SPL of 80 to 200 Hz gets totally smoothed out. This is almost a side effect of proper deep velocity absorption, with strategic placement, as we are actually focusing on the resonances with this type of treatment. But since there is not a resonance to be seen, we can rather look to something else...
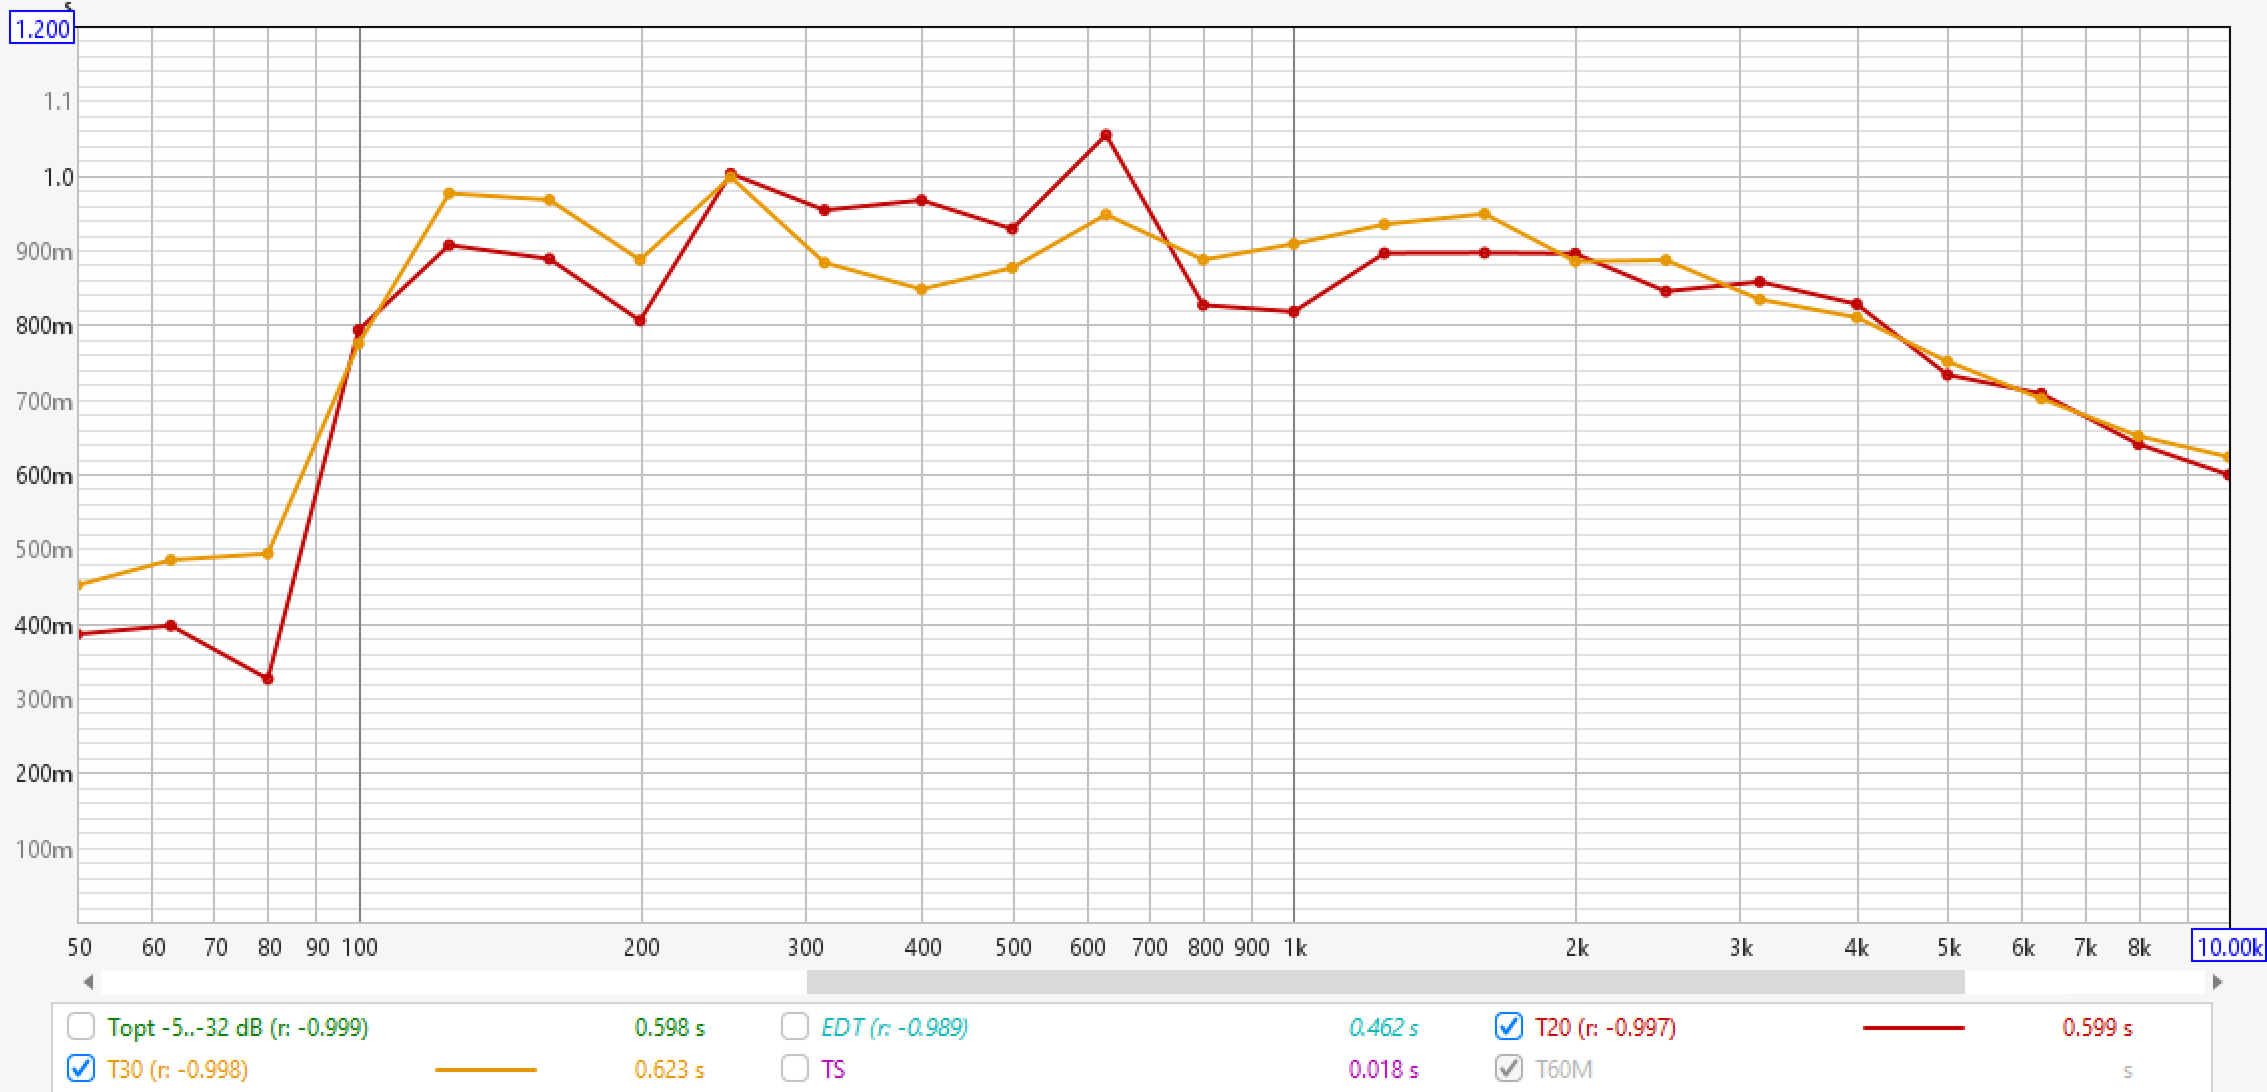
Okay, now on to Reverb Time:
Since a full 60 dB decay is difficult to measure accurately due to background noise, acousticians often use shorter decay ranges and extrapolate the RT60 value. This is where T20 and T30 come in:
-
T20 (RT20)
- Measures the decay from -5 dB to -25 dB.
- Uses this data to extrapolate the RT60 value.
- Less prone to background noise interference compared to RT60.
- More reliable in small rooms or environments with limited decay.
-
T30 (RT30)
- Measures the decay from -5 dB to -35 dB.
- Also extrapolates to RT60 but over a slightly longer range.
- Provides a more accurate estimate than R20 but may still be affected by noise.
Why Use RT20 or RT30 Instead of RT60?
- Shorter measurement windows reduce noise influence, especially in environments where the last 30 dB of decay is masked by ambient noise.
- More practical in small rooms, where full RT60 decay may not occur cleanly.
- Common in room acoustics and architectural acoustics, particularly for home studios, control rooms, and small venues.
R20 is in red. R30 is in orange. By showing both, you can see clearly what is happening!
![]()
Empty Room.

Leading Competitor 1 Solution - the worst is not yet resolved.

Leading Competitor 2 Solution - Better than Leading Competitor 1.

Both Leading Competitor 1 and Leading Competitor 2 Solutions in the room... 4,000 eur of acoustic "project".

KISS YOUR EARS Solution. Does exactly what it says on the tin (makes you want to kiss your ears). 2,000 EUR - almost exactly the same as the 4,000 EUR double solution!

KISS YOUR EARS part 2... 2,600+ spent. Beats the 4,000 spent on the other two!
Studio 2 Set Up

Okay, let's move on. We can move a bit faster now... We are all caught up on how to read the data, etc.
It is sunny again... This project was done over 4 separate days.

We actually filmed half of this project (2 of the 4 days).
Check out the Youtube version of Studio 2. Disclaimer: We are actually jackasses on camera. Maybe it is fun to see. This article is more important to really understand the data, though.

"Look, a spider!"

Leading Competitor 1 installation complete.

Leading Competitor 2 solution underway...

This room is full of irregularities. Shelving unit in the back, strange corners, a wall of windows. Don't worry too much about that. Rather focus on getting proper treatment from the right provider (we work worldwide, hint hint).

See... That corner on the left and the window offset things a bit... Oh well... We could even argue that this is beneficial for the overall experiment. All 4 rooms are different.

Leading Competitor 2 solution. Thanks guys.

Okay, now on to the good stuff. KISS YOUR EARS solution rolls in...

Mali trying to find his... camera.


Now we are talking. KISS YOUR EARS solution complete. In other words, most of the most important locations, hit minimally.

Now we upgrade it a bit with some low hanging fruits. This is how I would personally set up my side reflection units.

....loading acoustic solution...

Here is the upgraded KISS YOUR EARS solution (let's call it part 2). This is a common set up for professionals. I would personally actually orient the corner "towers" horizontally rather than doubled up vertically like here. Not for acoustic reasons but for aesthetic reasons. For acoustic reasons, I would add another unit to the ceiling cloud and take care of the 45 degree wall-to-ceiling corner location that looks so lonely here at the front of the room - top.

And, here is the back.

Hi Mali.

Another unit which we did in 2024 had the same bass register absorbent properties as the ones we see in this project, but also with a solid wooden diffuser front, diffusing from 2 kHz upwards. This is not a random brag... This is what happened in that room next:

After the experiment had graced this room, I turned it into my own temporary project studio for a while. These diffuser front smaller (but very structurally sturdy) units are the ultimate LEGO block for production and recording studios.
That flag depicts Scott Hutchison of Frightened Rabbit. My hero. R.I.P. Scott.
"while I'm alive, ill make tiny changes to Earth" - Scott Hutchison

Check out that wall-to-wall corner. Now covered by those little diffuser front bass trap blocks. Not only is it an often missed (and usually accessible) prime location in your studio for proper treatment, but it also makes an epic shelf for gear, etc. If I was not biased, I would propose 10/10 for function.

Note the place absolutely transforms once some gear gets added.
The thing that is the most rewarding for me personally is getting pics back from the clients that shows the collaboration we have created.
I have made hardcore contributions to this industry over the last decade so I don't even feel bad saying this:
I truly have love for the clients that send us pics in the end.
I don't like the few that don't.
The pictures are my real payment. The treasury (Finanzamt) takes the rest!

Consider a more "abfuser" based approach, especially if you will play drums, piano or guitar in the space. The acoustic energy re-radiating back into the space is preferable for live rooms.
Studio 2 Data
Studio 2 Dimensions
- Length: 4.2 m
- Width: 3.8 m
- Height: 3.05 m
- Total Area: 15.96 m²
![]()
Empty room.

Leading Competitor 1 solution. Quite the same as before. More same than different anyway. Still doesn't quite cut it as a good production and mixing studio.

Leading Competitor 2. Much more like a proper studio.

KISS YOUR EARS v1. Okay, here we go! Again, it speaks for itself. Tighter. Also notice how the brutal 40 Hz resonance was attenuated 7 dB more in this solution than Leading Competitor 2.

KISSS YOUR EARS solution upgraded (v.2) - We got another 5 dB attenuation on that roughly 40 Hz beast. That's how it goes with the low ones - they need mass to resolve. It does require some understanding (from empirical experience) to understand the practical impact of velocity absorption on low frequencies.

KISS YOUR EARS bonus level. My temporary project studio setup. Tight. Most of the entire spectrum takes around 120 ms to attenuate 30 dBs.
![]()
Reverb time... time! Empty Room. Mess.

Leading Competitor 1. Semi mess.

Leading Competitor 2. Looks much better.

KISS YOUR EARS. even better still.

KISS YOUR EARS v2. Every little helps! Flat as a pancake.
Studio 3 Set Up

Check out the Youtube video of Studio 3 from this experiment.
Again, it's pretty dumb... pretty fun. We have to make the most dry and scientific element of music production fun and accessible, you know!?


Leading Competitor 1 solution installed.


Leading Competitor 2 solution installed.

We decided throw it all in again! Leading Competitor 1 and Leading Competitor 2... all in, full house. Since this is about showing you the practical reality...

And this truly is what most of our clients rooms look like before they get an upgrade from us.

In come KISS YOUR EARS to sort it out.


Here is the minimum version... (v1) The back is pretty empty.

For this one we bring in some of those diffuser front bass blocks... They are pretty.
![]()
Studio 3 Data
Studio 3 Dimensions
- Length: 3.8 m
- Width: 3.8 m
- Height: 3.05 m
- Total Area: 14.44 m²
![]()
Empty room.

Leading Competitor 1.

Leading Competitor 2.

Both Leading Competitor 1 and Leading Competitor 2's solutions piled in. 4,000 EUR.

KISS YOUR EARS 2,000 EUR.
![]()
Reverb time, empty room.

Leading competitor 1.

Leading competitor 2.

Both Leading Competitor 1 and Leading Competitor 2's solutions piled in. 4,000 EUR.

KISS YOUR EARS 2,000 EUR.

...and KISS YOUR EARS with the slight upgrade of adding the diffuser front units in the back corners.
Studio 4 Set Up

This is for those who have a tiny studio and cannot install anything on the ceiling. We used a side room in our factory.


Leading Competitor 1 solution installed.


Leading Competitor 2 solution installed.

A wild brocolli head appeared.

KISS YOUR EARS in the backstage... We left the other units installed in the last studio... so for this we used a different set up. Same price tag. Slightly less units. They are prettier.

See...


Yours truly, keeping it real.
Studio 4 Data
Studio 4 Dimensions
- Length: 4.33 m
- Width: 2.0 m
- Height: 3.12 m
- Total Area: 8.66 m²
![]()
Empty room.

Leading Competitor 1.

Leading Competitor 2.

KISS YOUR EARS minimal solution - less units than the other rooms. Still beats Leading Competitor 1 and Leading Competitor 2. Pay attention to the white area we like to look at.
![]()
Now on to reverberation times. First the empty room.

Leading Competitor 1.

Leading Competitor 2.

KISS YOUR EARS minimal solution.
Conclusion
These are off-the-shelf systems.
Our off-the-shelf solution dominated within the given budget, and we proved the trend over several rooms. We would outperform at other budgets as well, but this project was designed to be maximally informative within the current market landscape. The everyday client has a 2,000 EUR net budget, and has to compromise on which room they can use as their studio - and gets a bit too caught up on tiny details that don't actually matter.
Honestly, your set up will be the same for the first steps regardless of the irregularities because all of the locations pictured are highly recommended to take care of in a professional studio.
The same designer behind the market-dominating off-the-shelf system is now available to create tailored solutions for your studio.
Those solutions were basic 2,000 EUR sets.
Our 2,000 EUR set dominated 4,000 EUR of other treatment providers solutions!
So imagine what we can do when you:
1. Have a larger budget.
2. Stop thinking about products and ask us for a synergistic full room solution.
For a 20-25m² room with a budget of €5,000 to €10,000, I can deliver world-class results—five levels beyond what was achieved here. Again, even at just €2,000, our solution consistently surpassed competitors acoustically, aesthetically, and functionally.
I'll put a number to it. I can design you a studio worth 25k for 10k. Bear that in mind.
We don’t just sell products; we provide complete solutions. The sky is the limit. You set the budget, and we’ll deliver the highest possible quality. We can show you real data from a wide range of scenarios.
Yes, budget is always a factor - but at higher budgets, we can take your space to extraordinary levels. Even at lower budgets, we guarantee transformative results.
Forget individual products. We can create custom, one-off systems if that’s what it takes. This is about solving your actual problems.
This outcome was predictable and logical - but I ran this project for you.
If you want a KISS YOUR EARS solution for your sacred space, get in touch!


Leave a comment
All comments are moderated before being published.
This site is protected by hCaptcha and the hCaptcha Privacy Policy and Terms of Service apply.