How to Set Up Your Stereo Monitors
Listening rooms are designed to give engineers and producers an acoustically transparent listening space - a space where they can trust their creative decisions. Setting up your room to make the most of its acoustic properties significantly depends on how you place your listening position and speakers. We’ve put this together to help you through this process.
Note: this is designed as a setup guide preceding acoustic treatment of a room. In an empty room with no treatment, ca. 60% of what you are hearing is just the room itself. One could infer that it is somewhat futile to get precise in such circumstances.
Success in reaching this objective generally relies on 3 important criteria:
- The geometry of the room which determines its acoustic properties,
- The positioning and performance of the playback system,
- Localisation of the sweet spot or listening position.
For the majority of studios in urban metropolitan areas, it can be quite challenging to overcome the acoustic problems that are inherent in rooms with smaller proportions. Such challenges are due to the physical characteristics of how sound propagates in these spaces. This may include a sparse distribution of low frequency modal content, or comb filtering due to either first reflections or speaker boundary interference. For this reason, it is extremely important to set up your listening position right the first time, and luckily there are a bunch of free tools and resources to help you do so!
Please note that this document does not apply rooms that are not rectangular or trapezoidal in shape. For irregularly shaped rooms, your best option would be to use an open source software such as Room Eq Wizard to measure which listening and speaker position would be most suitable. And yes, that process will be looooooong...
Step 1 - Model your room in a free online acoustics calculator
It’s very easy and it’s free. If your room is box shaped, you can use a free online calculator to predict which frequencies may be problematic, and where their pressure zones may lie. Some acoustic calculators even provide a sine wave generator which lets you play different frequencies, allowing you to test the model in real time. The following screenshot is a capture from an acoustics calculator called amroc by amcoustics.com:

We can see that there is a strong axial mode which has a pressure build up at the center of the room, causing a disturbance at roughly 61Hz or B1. The effect is that every time you hear the note B1, it may sound uneven compared to the other notes or frequencies within the room. It may have a longer decay and poorer transient response - sounding muddy and undefined. From this data, you can start to gain an understanding of the acoustic landscape within your listening space and make notes about which frequencies you may want to target through your room setup.
Step 2 - Refer to your Monitoring Guide!
Before proceeding with your speaker set up and placement, please read your documents! Your operating manual should describe how your reference monitor loudspeakers should be set up, whether that be vertically or horizontally. (Note: not all monitors are suitable for horizontal placement). It is advised not to play with the room equalisation settings or trimming filters on the back of your speaker until you have exhausted all other options after treatment.
Step 3 - Stereo Loudspeaker Placement.
In the majority of cases, you probably have a two way stereo channel playback system. For rooms that are over 20m², you should be aiming to set up your monitoring environment in accordance with the international standards for the subjective assessment of audio systems, given by the International Telecommunications Union (ITU-R BS.1116-3). For rooms under 20m², you may want to refer to the Audio Engineering Society’s technical document on multichannel systems for further information (AESTD.1001.1.01-10). In either case however, you should begin by setting your speakers in an equilateral triangle as such:

The reference listening position is defined as being at a 60 degree angle from your monitors. For the majority of cases, your setup will dictate the reference listening position to be along the length axis of your room, however it is also possible to set up your speakers along the horizontal axis (depending on what is practical and sounds best).
Your listening position within the room may vary with the base distance of your equilateral triangle, but pay attention to ensure that it does not put you at 50% of the room’s length axis! This is one of the worst positions to be situated at. Finding an optimal position may take a little bit of experimentation. On the most basic level, you can use your ears as your measurement apparatus!
Try moving yourself backward and forward through the center of the width axis within your room, while playing either pink noise or a sine function of your problematic frequencies. Try to mark on the floor where you feel that there is an even distribution of tones, and where you think some may be exaggerated. Ideally you should try to set your stereo triangle from a listening point where there is the least amount of roominess in your signal.
The speaker height should match your ear level height, from the point between the tweeter and woofer. The distance from the speaker to its nearest reflecting surfaces will determine the speaker boundary interference frequencies. The first reflection points will determine the comb filtering reaching your ears.
Want to know how we do it? We have developed a systemised protocol to speed up this process as during our installation service:
1. Go in and measure L, W, H with a laser measurement tool.
2. Mark the following juncture on the floor with tape: L x 0.38, W x 0.5. This gives the starting listening position at 38% of the room.
3. Set up the speakers in an equilateral triangle, aiming to have absorbent behind them.
4. If there is a subwoofer, make sure the cone is aligned with the cones of the satellites. Offset the sub from one side wall with the calculation: W x 0.38. Alternatively you can do a “center of the centre” calculation on the “width axis” (mark 50% on the floor, then 50% of each of those 50% 's and so on…) and make sure you offset from all of the lines you mark out.
5. Measure with sine sweeps from 40 to 400 hz (nightclub system bass response in Berlin generally cuts off at 40hz, and bass frequencies are generally considered to go up until 250-300Hz. The fundamental range of a 4-string bass guitar are also at ca. 40-400 Hz). Of course, if you are a BASSHEAD then measure from 30Hz or lower if your system can take it.
6. Mark tape on the floor in front and behind your starting listening position and from your speaker axis to the listening position. We start with the speakers almost hard up against where the absorbent will be and move forward only, so as to avoid compiling confusing data.
7. Sequentially move the speaker position 10cm forward each time, and measure several listening positions for each speaker position (eg, 10cm forward, 20cm forward, 10cm back, 20cm back, etc). Make sure you compile your data with a clear and logical format/ key.
8. 30dB peaks and nulls moving around on a 10cm increment? That may seem crazy but believe it or not, that is commonplace. Good treatment will take care of that though.

Step 4 - Getting Precise
Try using a measurement software such as Room Eq Wizard to map the frequency response of each channel using an MLS sequence or logarithmic sweep. In high level mixing suites, there should be less than +- 3dB variation per channel with less than 20 microseconds of delay. Try to find a spot as close as you can to this goal!
Play around with your positioning and the dimensions of your equilateral triangle to find the exact position where your left and right channels are closest to each other in terms of phase, frequency and symmetry. The following screenshots are taken from two different measurements taken in a 14m² room (quite small - yet standard for most urban spaces):

Pay attention to the dip at 150Hz. Both speakers were positioned 52cm to the front wall, and 80cm from the side wall, with a base distance of roughly 1.45m.
Better:

Notice how the dip at 150Hz completely disappears and the two lines mirror each other in more detail, and that’s without any treatment! Both speakers were moved to a distance of 37cm from the front wall and 51cm from the side walls, with a base distance of roughly 1.9m.
Step 4 - Furnishings
The last step should be to bring in your furniture and studio equipment such as mixing consoles, monitors and other gear. If you want to get nitpicky, you could make another measurement to see if your desk or other equipment could be leading to comb filtering through reflections. This may be particularly relevant for a large surface mixing console or production desk. To be blunt about it: every hard surface you put in your room is theoretically a problem, but room acoustics is a holistic game of compromise. There is always a way!
Step 5 - Treatment
Once you are confident with your monitoring and listening position, you will be in a good position to proceed with the installation of your treatment.
If you are unsure about how to go about planning your set up, simpy get in touch with us via info@kissyourears.com and provide the following information:
- Floor plan sketch with dimensions
- Pictures of the space
- Usage (what you will do there)
- Budget for the project
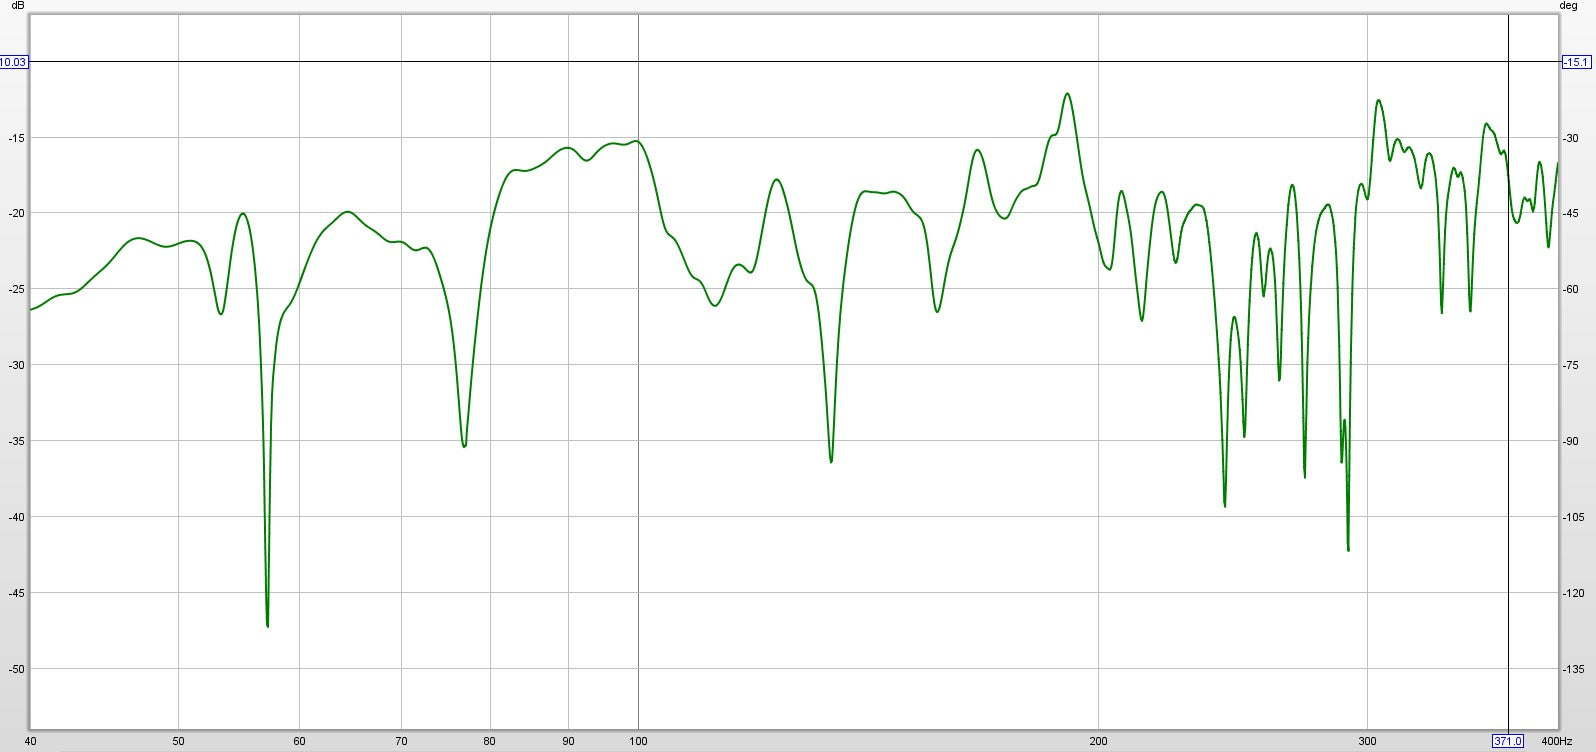
Below are some measurements of one 10” monitor speaker (L) in a 24m² room, to further illustrate the vast differences that speaker placement can make, and how that can be thought of as essential in the acoustic treatment process. A professional acoustic treatment procedure evaluates many (small and large) adjustments cumulatively and holistically.

SPL of 40-400hz of the original speaker positioning. Each marker line on the Y-axis represents 5dB.

SPL of 40-400hz of the adjusted speaker positioning, before adding 9 x King Kong Bass Traps to the 24m² room.
SPL of 40-400hz of the adjusted speaker positioning, after adding 9 x King Kong Bass Traps. Remember, this is the mono playback of one speaker.

Waterfall, 40-400hz, Before. Think of the back line (horizon) to be the SPL level. Think of the font line (shoreline) to be the real problems we are facing. This displays 300ms of decay time from horizon to shoreline.

Note: Only 4 units are positioned as “Bass Trap function”. We would need more than this in a space this large to diminish the resonance at 55Hz. Interestingly, the smaller resonance at 45Hz has been attenuated. Nevertheless, this is quite a result for a 24m² room with a 10” monitor, considering how little covered surface area the 9 traps actually add.
Our rule of thumb for a production & mixing suite is 1 King Kong Bass Trap per m² of floor space (this tends to equate to any other % based surface area coverage rule, as long as the ceilings are less than 4m tall).
We then suggest 1.5 King Kong Bass Traps per m² of floor space in order to turn it into a very high end mixing and mastering control room.
That also equates to the maximum that can be achieved with optimised velocity absorption before introducing the next step in treatment, which would be pressure based traps.
For the record, the above diagram shows the result of less than 0.4 traps per m², so don’t worry too much if you cannot yet reach the 1 or 1.5 traps per m² goal. This shows that even the first steps towards that goal make a huge difference in diminishing the problematic room resonances and beginning to equalize the SPL along the subharmonic frequency spectrum.